前言
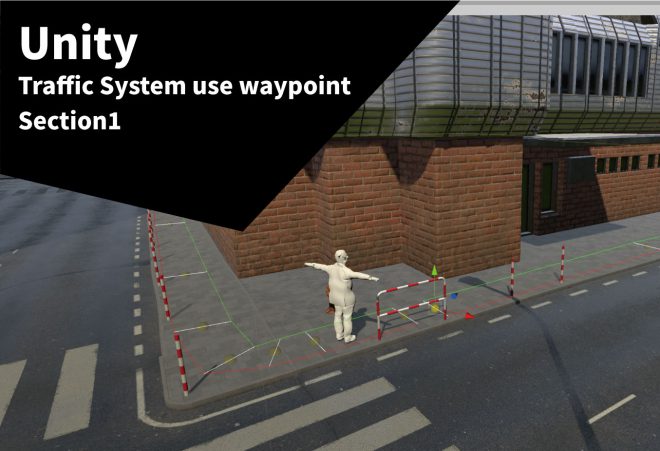
我們在場景中常常需要有一些NPC,不管是在遊戲或是虛擬場景通常都會有路上的行人走動,而今天我們就利用強大的C#製作出一個Traffic System的系統,讓我們的場景NPC可以依照我們製作的Waypoint路線走動,讓整個場景看起來更加完整,加上Ragdoll功能的話更可以像GTA遊戲一樣可以造成路人被車體碰撞的效果。
Traffic System可以包含車子、行人、騎車的人甚至路上的動物等等,這些都是算在 Traffic System 的系統裡面,本篇的重點先以路上的行人為主,讓我們創建的角色可以依照我們製作的Waypoint行走,是不是很有趣呢。

CharacterNavigationController
一開始最重要的就是我們的人物Controller了,這邊找了很久才找到國外大神分享的人物控制語法,有興趣的朋友可以看一下這篇影片了解人物的Character Navigation Controller之間的控制。
在我們使用套上 Character Navigation Controller 之前我們需要自己創建一個角色或是在Assets Store上面下載免費角色並套上動畫。

依照需求可以先在unity裡面設定自己的角色所需要的動畫,動畫的部分可以上mixamo依照自己的需求製作不同人物動畫使用。

按下play看一下我們的人物走路動畫是否正常運作,這邊注意要讓動畫是原地行走的,因為我們移動的位置需要靠語法控制,若動畫一開始就設定有位置移動的畫反而會讓人物走路變得很奇怪。

如果大家的走動動畫是用 mixamo 的話只要勾選In Place他就不會亂跑了。

設定好動畫以後我們來先給我們角色 Character Navigation Controller 的語法,這套語法主要是要告訴我們的角色該往哪走並在Waypoint裡面指定這套控制角色依照我們的waypoint範圍行走。
using System.Collections;
using System.Collections.Generic;
using UnityEngine;

public class CharacterNavigationController : MonoBehaviour
{
    public float movementSpeed = 1;//移動速度
    public float rotationSpeed = 120; //旋轉速度
    public float stopDistance = 2f; //停止距離
    public Vector3 destination;
    public Animator animator;
    public bool reachedDestination;

    private Vector3 lastPosition;
    private Vector3 velocity;

    private void Awake()
    {
        movementSpeed = Random.Range(0.8f, 2f); //移動速度的random及範圍
        animator = GetComponent<Animator>();

    }


    void Update()
    {
        if (transform.position != destination)
        {
            Vector3 destinationDirection = destination - transform.position;
            destinationDirection.y = 0;
            float destinationDistance = destinationDirection.magnitude; //目的地方向

            if (destinationDistance >= stopDistance)
            {
                reachedDestination = false; //到達目的地
                Quaternion targetRotation = Quaternion.LookRotation(destinationDirection);
                transform.rotation = Quaternion.RotateTowards(transform.rotation, targetRotation, rotationSpeed * Time.deltaTime);
                transform.Translate(Vector3.forward * movementSpeed * Time.deltaTime);
            }
            else
            {
                reachedDestination = true;

            }

            //指定角色目的地

            velocity = (transform.position - lastPosition) / Time.deltaTime;
            velocity.y = 0;
            var velocityMagnitude = velocity.magnitude;
            velocity = velocity.normalized;
            var fwdDotProduct = Vector3.Dot(transform.forward, velocity);
            var rightDotProduct = Vector3.Dot(transform.right, velocity);

            animator.SetFloat("Horizontal", rightDotProduct);
            animator.SetFloat("Forward", fwdDotProduct);
        }

        lastPosition = transform.position;

    }


    public void SetDestination(Vector3 destination)
    {
        this.destination = destination;
        reachedDestination = false;
    }

}
Waypoint
首先我們在Scripts裡面新建一個叫做Waypoint的C#語法,這個語法主要是指定我們角色所要走的範圍及寬度資訊等等。

using System.Collections;
using System.Collections.Generic;
using UnityEngine;

public class Waypoint : MonoBehaviour
{
    public Waypoint previousWaypoint; //開頭的waypoint
    public Waypoint nextWaypoint; // 接著的waypoint

    [Range(0f, 5f)]
    public float width = 1f; //範圍的寬度

    public List<Waypoint> branches = new List<Waypoint>();

    [Range(0f, 1f)]
    public float branchRatio = 0.5f;


    public Vector3 GetPosition()
    {
        //兩者之間的距離
        Vector3 minBound = transform.position + transform.right * width / 2f;
        Vector3 maxBound = transform.position - transform.right * width / 2f;

        return Vector3.Lerp(minBound, maxBound, Random.Range(0f, 1f));

    }
}
WaypointMangerWindow
因為在製作Waypoint的時候如果沒有明顯的GUI會導致很難在場景上直覺的畫出,所以我們這邊需要在Editor裡面製作WaypointManagerWindow的C#語法。

這邊記得這套語法是用在Editor裡面,所以我們必須先using UnityEditor;
using System.Collections;
using System.Collections.Generic;
using UnityEditor;
using UnityEngine;

public class WaypointMangerWindow : EditorWindow
{
    [MenuItem("Tools/Waypoint Editor")]
    public static void Open()
    {
        GetWindow<WaypointMangerWindow>();

    }

    public Transform waypointRoot;

    //畫waypoint的GUI
    private void OnGUI()
    {

        SerializedObject obj = new SerializedObject(this);

        EditorGUILayout.PropertyField(obj.FindProperty("waypointRoot"));

        if (waypointRoot == null)
        {
            //報錯視窗
            EditorGUILayout.HelpBox("Root transform must be selected. Please assign a root transform.", MessageType.Warning);
        }

        else
        {
            EditorGUILayout.BeginVertical("box");
            DrawButtons();
            EditorGUILayout.EndVertical();
        }

        obj.ApplyModifiedProperties();

    }

    //GUI畫件按鈕
    void DrawButtons()
    {
        if (GUILayout.Button("Create Waypoint"))
        {
            CreateWaypoint();
        }
        if(Selection.activeGameObject !=null && Selection.activeGameObject.GetComponent<Waypoint>())
        {
            if(GUILayout.Button("Create Waypoint Before"))
            {
                CreateWaypointBefore();
            }
            if(GUILayout.Button("Create Waypoint After"))
            {
                CreateWaypointAfter();
            }
            if(GUILayout.Button("Remove Waypoint"))
            {
                RemoveWaypoint();
            }
        }
    }

    //接續畫出waypoint
    void CreateWaypoint()
    {

        GameObject waypointObject = new GameObject("Waypoint" + waypointRoot.childCount, typeof(Waypoint));
        waypointObject.transform.SetParent(waypointRoot, false);

        Waypoint waypoint = waypointObject.GetComponent<Waypoint>();
        if (waypointRoot.childCount > 1)
        {
            waypoint.previousWaypoint = waypointRoot.GetChild(waypointRoot.childCount - 2).GetComponent<Waypoint>();
            waypoint.previousWaypoint.nextWaypoint = waypoint;

            // 放Waypoint在最後的位置
            waypoint.transform.position = waypoint.previousWaypoint.transform.position;
            waypoint.transform.forward = waypoint.previousWaypoint.transform.forward;

        }

        Selection.activeGameObject = waypoint.gameObject;


    }

    void CreateWaypointBefore()
    {
        GameObject waypointObject = new GameObject("Waypoint " + waypointRoot. childCount, typeof(Waypoint));
        waypointObject.transform.SetParent(waypointRoot, false);

        Waypoint newWaypoint = waypointObject.GetComponent<Waypoint>();

        Waypoint selectedWaypoint = Selection.activeGameObject.GetComponent<Waypoint>();

        waypointObject.transform.position = selectedWaypoint.transform.position;
        waypointObject.transform.forward = selectedWaypoint.transform.forward;

        if(selectedWaypoint.previousWaypoint != null)
        {
            newWaypoint.previousWaypoint = selectedWaypoint.previousWaypoint;
            selectedWaypoint.previousWaypoint.nextWaypoint = newWaypoint;
        }

        newWaypoint.nextWaypoint = selectedWaypoint;

        selectedWaypoint.previousWaypoint = newWaypoint;

        newWaypoint.transform.SetSiblingIndex(selectedWaypoint.transform.GetSiblingIndex());

        Selection.activeGameObject = newWaypoint.gameObject;


    }
    //Waypoint下一個點
    void CreateWaypointAfter()
    {
        GameObject waypointObject = new GameObject("Waypoint " + waypointRoot.childCount, typeof(Waypoint));
        waypointObject.transform.SetParent(waypointRoot, false);

        Waypoint newWaypoint = waypointObject.GetComponent<Waypoint>();

        Waypoint selectedWaypoint = Selection.activeGameObject.GetComponent<Waypoint>();

        waypointObject.transform.position = selectedWaypoint.transform.position;
        waypointObject.transform.forward = selectedWaypoint.transform.forward;

        newWaypoint.previousWaypoint = selectedWaypoint;

        if(selectedWaypoint.nextWaypoint !=null)
        {
            selectedWaypoint.nextWaypoint.previousWaypoint = newWaypoint;
            newWaypoint.nextWaypoint = selectedWaypoint.nextWaypoint;
        }
    }
    //移除Waypoint
    void RemoveWaypoint()
    {
        Waypoint selectedWaypoint = Selection.activeGameObject.GetComponent<Waypoint>();

        if(selectedWaypoint.nextWaypoint != null)
        {
            selectedWaypoint.nextWaypoint.previousWaypoint = selectedWaypoint.previousWaypoint;

        }
        if(selectedWaypoint.previousWaypoint != null)
        {
            selectedWaypoint.previousWaypoint.nextWaypoint = selectedWaypoint.nextWaypoint;
            Selection.activeGameObject = selectedWaypoint.previousWaypoint.gameObject;
        }

        DestroyImmediate(selectedWaypoint.gameObject);

    }
}
建立好我們的 WaypointManagerWindow 以後如果沒有報錯就可以看到在Unity的Tools裡面多了一個WaypointEditor的插件了。

接著我們新曾一個空白的GameObject並重新命名為Waypoint,並將這個物件拖進剛剛點開的WaypointMangerWindow裡面有一個WaypointRoot當作整個Waypoint的根,這邊的Waypoint記得要擺在我們人物要走的一開頭。

按下Create WayPoint的時候會發現我們少了一些Gizmos視覺的產出,雖然可以畫出Waypoint的各個點了,這邊還是需要另外寫一個語法帶有Gizmos幫助我們更直覺地畫線。

WaypointEditor
因為WayPointEditor也是需要在Unity的Editor裡面製作,如之前所說目前的GUI效果需要Gizmos去顯示,所以我們必須要另外製作一個定義Gizmos的C#語法

using System.Collections;
using System.Collections.Generic;
using UnityEngine;
using UnityEditor;

[InitializeOnLoad()]
public class WaypointEditor
{
    //利用Gizmos視覺化Waypoint,包含選取、沒被選取、挑選
    [DrawGizmo(GizmoType.NonSelected | GizmoType.Selected | GizmoType.Pickable)]
    public static void OnDrawSceneGizmo(Waypoint waypoint, GizmoType gizmoType)
    {
        //如果被選取後顯示的顏色
        if((gizmoType & GizmoType.Selected) !=0 )
            {
            Gizmos.color = Color.yellow;
        }
        //如果沒有選取顯示的顏色
        else
        {
            Gizmos.color = Color.yellow * 0.5f;
        }

        Gizmos.DrawSphere(waypoint.transform.position, .1f);

        //顯示Waypoint寬度的顏色
        Gizmos.color = Color.white;
        Gizmos.DrawLine(waypoint.transform.position + (waypoint.transform.right * waypoint.width / 2f),
            waypoint.transform.position - (waypoint.transform.right * waypoint.width / 2f));

        if (waypoint.previousWaypoint != null)
        {
            //顯示previousWaypoint顏色
            Gizmos.color = Color.red;
            Vector3 offset = waypoint.transform.right * waypoint.width / 2f;
            Vector3 offsetTo = waypoint.previousWaypoint.transform.right * waypoint.previousWaypoint.width / 2f;
            Gizmos.DrawLine(waypoint.transform.position + offset, waypoint.previousWaypoint.transform.position + offsetTo);
        }
        //顯示nextWaypoint顏色
        if (waypoint.nextWaypoint !=null )
            {
            Gizmos.color = Color.green;
            Vector3 offset = waypoint.transform.right * -waypoint.width / 2f;
            Vector3 offsetTo = waypoint.previousWaypoint.transform.right * -waypoint.previousWaypoint.width / 2f;
            Gizmos.DrawLine(waypoint.transform.position + offset, waypoint.previousWaypoint.transform.position + offsetTo);

        }


    }

}
可以從下圖標示看到我們在語法上面所標示的顏色
NonSelected – 透明黃色
Selected – 黃色
Width – 白色
PreviousWaypoint-綠色
NextWaypoint – 紅色

新增了Gizoms的視覺以後就很容易拉Waypoint了,這時候我們就依照自己需要NPC走動的路線繪製路線。


連到到一個圈以後大家會發現我們沒辦法剛好全部連接,這邊的方法很簡單。因為我們建立的每一個Waypoint都有 PreviousWaypoint 跟 NextWaypoint 兩個需要對接前後,所以最後一個 Waypoint的NextPoint就是第一個Waypoint,將他拉進去即可。

反之,第一個Previous也要將最後一個Waypoint拉進去,這樣就可以完成了一個完整的圈圈了。

WaypointNavigator
完成了我們的Waypoint的拉線工作以後,接著就是要讓我們的角色跟著路線走了,這邊我們新建一個新的C#語法並命名為WaypointNavigator。
using System.Collections;
using System.Collections.Generic;
using System.ComponentModel;
using UnityEngine;

public class WaypointNavigator : MonoBehaviour
{
    CharacterNavigationController controller; //把CharacterNavigationController當作控制器
    public Waypoint currentWaypoint;
    float direction;


    void Start()
    {
        controller = GetComponent<CharacterNavigationController>(); //使用CharacterNavigationController Coponent
        controller.SetDestination(currentWaypoint.GetPosition());
        direction = Mathf.RoundToInt(UnityEngine.Random.Range(0, 1));

    }


    void Update()
    {
        if(controller.reachedDestination)
        {
            if(direction == 0)
            {
                currentWaypoint = currentWaypoint.nextWaypoint;
            }
            else if(direction == 1)
            {
                currentWaypoint = currentWaypoint.previousWaypoint;


        }
            controller.SetDestination(currentWaypoint.GetPosition());
        }
    }
}
然後我們在角色上加裝剛剛寫好的 WaypointNavigator 並將我們所要讓角色跟隨的Waypoint1拉進當前的Waypoint,這樣我們的角色就可以根據我們所建立的Waypoint走動了。


看到成果後是不是覺得很有趣呢?

小記
本篇以單角色的數量製作Traffic System系統,當然如果是正常的世界路上不會只有一個人在走動而已,接著我們必須在多加幾個C#語法讓我們的Wayppoint上充滿人物,這套系統不只能夠製作人物的走動,之後也可以運用在NPC車子或是騎車的人等等,雖然在AssetsStore有人有在賣整套的系統,但是其中我們可以學習到更多舉一反三的用法,且這套系統的C#語法也是很難得可以學習到的。
資料來源:https://www.youtube.com/watch?v=MXCZ-n5VyJc&t=601s
