前言
在我們做了很多的場景以後,常常在想是否可以在場景裡面走動猶如CS槍戰的奔跑呢?今天就跟著大家一起實作看看如何利用簡單的物件就可以製作出第一人稱的視角並在自己所建立的場景盡情奔跑。
First Player
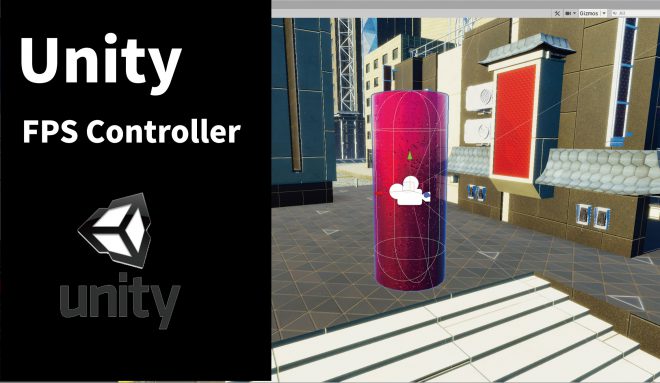
首先我們製作一個空白的EmtyObject當作我們的player

接著我們在我們的Player物件上新增Charater Controll,並將Scle數值設定為X1.2 Y1 Z1.2 ,同時我們也將Charater Controller的Radius 設為 0.8 Hight設為3.8 這樣會比較符合人型的高度。

因為一個空白的物件看起來略顯無趣,我們用最簡單的3D物件Cylinder當作我們的人物,建立在FirstPlayer的子層級,並將大小設定跟我們的Charater Controller差不多大即可。
接著因為是第一人稱的視角,所以我們將Camera拉到FirstPlayer的子層級,並將Camera的position皆設定為0這樣才不會在奇怪的位置。

一個人的視角應該是在頭部的位置,所以我們將camera拉到頂點,這樣我們接下來製作的camera視角轉動等等就會比較符合人的視角而不會感到奇怪,我們也可以從Game模式看到目前FirstPlayer所看到的視角了。

Mouse Look
這邊我們先製作頭部部分的C#語法,讓我們的camera可以隨著我們的滑鼠跟著旋轉。
using System;
using System.Collections;
using System.Collections.Generic;
using System.Security.Cryptography;
using UnityEngine;

public class MouseLook : MonoBehaviour
{
    public float mouseSensitivity = 100f;

    public Transform playerBody;

    float xRotation = 0f;
    void Start()
    {

    }

    void Update()
    {
        //旋轉身體的視角
        float mouseX = Input.GetAxis("Mouse X") * mouseSensitivity * Time.deltaTime;
        float mouseY = Input.GetAxis("Mouse Y") * mouseSensitivity * Time.deltaTime;

        xRotation -= mouseY;
        xRotation = Mathf.Clamp(xRotation, -90f, 90f); // 讓頭部旋轉在90度

        transform.localRotation = Quaternion.Euler(xRotation, 0f, 0f);
        playerBody.Rotate(Vector3.up * mouseX);
    }
}
將語法寫好後我們將我們的Player拉近MouseLook的PlayerBody

來看一下效果吧! 我們的攝影機會回著滑鼠的移動而改變視角了

接著我們增加幾個Script讓我們的頭部可以上下轉動並瑣在90度,讓視角可以看到上下並不會過頭。

可以看到我們在看上下要繼續往上的時候就會停在90度以內不會超過,反之往下也是,這樣才是正常的旋轉視角。

PlayerMovement
搞定了Mouse Look以後我們就來設定這個”人”的前進後退吧! 這邊在Player上面新增一個PlayerMovement的語法。

using System.Collections;
using System.Collections.Generic;
using System.Security.Cryptography;
using System.Threading;
using UnityEngine;

public class PlayerMovement : MonoBehaviour
{
    public CharacterController controller;
    public float speed = 12f;//移動速度
    void Update()
    {
        float x = Input.GetAxis("Horizontal");//input水平
        float z = Input.GetAxis("Vertical");//input垂直

        Vector3 move = transform.right * x + transform.forward * z;

        controller.Move(move * speed * Time.deltaTime);
    }
}
這時候記得我們要將Character Controller拉近我們的Player Controller裡面

製作好以後我們就可以看一下效果了,我們的腳色就可以依照我們鍵盤的指示前進後退到處趴趴走了,而且別忘了我們的Mosue Look也是有在作用的,滑鼠的移動也是可以改變目前所看的視角。

Gravity
如果眼尖的大家應該是有發現,目前我們的腳色就像幽靈一樣在空中飄浮,這是因為我們沒有給他重力,而以往我們都是給他一個Rigibody當作動力,這邊我們利用C#語法給他來點重力吧~
using System.Collections;
using System.Collections.Generic;
using System.Security.Cryptography;
using System.Threading;
using UnityEngine;

public class PlayerMovement : MonoBehaviour
{
    public CharacterController controller;
    public float speed = 12f;//移動速度
    public float gravity = -9.81f;//重力

    Vector3 velocity;

    void Update()
    {
        float x = Input.GetAxis("Horizontal");//input水平
        float z = Input.GetAxis("Vertical");//input垂直

        Vector3 move = transform.right * x + transform.forward * z;

        controller.Move(move * speed * Time.deltaTime);

        velocity.y += gravity * Time.deltaTime;

        controller.Move(velocity * Time.deltaTime);

    }
這邊我將我們的腳色方在高處,大家就可以看到有重力的往下垂降,而且也不會像幽靈一樣到處飄,更可以爬樓梯等等。

Ground Check
在我們運作的過程中可以打開我們Player的Debug,會發現到我們的Velocity的Y數值不停地Rising,為了改善這個現象我們必須給他一個Ground Check

首先我們一樣在FirstPlayer上新增一個空白物件並命名為GroundCheck

而GroundCheck的位置必須在我們Player的最底部

並新增GroundCheck的語法
using System.Collections;
using System.Collections.Generic;
using System.Security.Cryptography;
using System.Threading;
using UnityEngine;

public class PlayerMovement : MonoBehaviour
{
    public CharacterController controller;
    public float speed = 12f;//移動速度
    public float gravity = -9.81f;//重力

    public Transform groundCheck;
    public float grounDistance = 0.4f;
    public LayerMask groundMask;

    Vector3 velocity;
    bool isGrounded;

    void Update()
    {
        isGrounded = Physics.CheckSphere(groundCheck.position, grounDistance, groundMask);

        if(isGrounded && velocity.y<0)
        {
            velocity.y = -2f;
        }

        float x = Input.GetAxis("Horizontal");//input水平
        float z = Input.GetAxis("Vertical");//input垂直

        Vector3 move = transform.right * x + transform.forward * z;

        controller.Move(move * speed * Time.deltaTime);

        velocity.y += gravity * Time.deltaTime;

        controller.Move(velocity * Time.deltaTime);

    }
}
這邊記得要將我們原本新建的GroundCheck拉進語法裡面新增的function並將GroundMask的Layer選項選擇為Ground,並記得我們在場景裡面所有的地面物件都一樣要選擇Ground Layer

最後我們來看看成果吧! 能夠在自己所創建的場景奔跑的感覺真是不賴

小記:
目前使用的都是較為簡單的語法以及3D物件,主要是讓我們可以有個基礎知道如何在場景裡面創建第一人稱的視角,雖然目前的專案或許還用不到但是透過一些物理的語法控制,我們多多少少還是可以從中學習到不少的東西,以利運用在未來的專案上。
參考資料:https://www.youtube.com/watch?v=_QajrabyTJc