|簡介|
該章節在研究如何將3D模型導入VPX中,並能以粒子呈現該3D模型的形態,目前選用Point Cache的方式,轉換3D模型(使用.fbx檔案),就可以將模型轉入VPX中。
|目的|
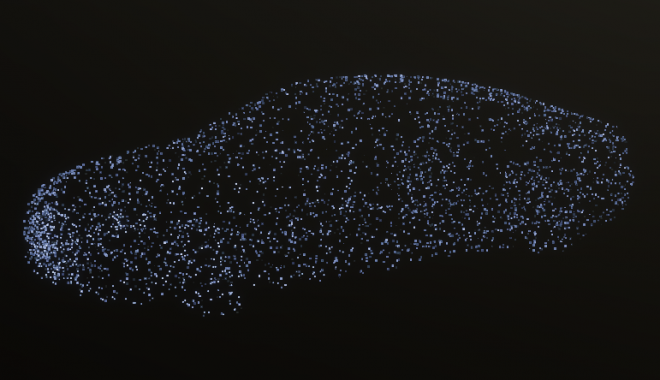
將自建的3D模型,轉換成具體填滿VPX粒子特效的形體。

1.首先建立一個VPX檔案,再將VPX拉到Hierarchy中,再到功能列 [Window],再找到 [Visual effects],再找[Utilities],開啟Point Cache bake tool。

2.在Point Cache bake Tool中,可以透過新增一個3D的Mesh的檔案,將該檔案烘培成可以導入VFX使用的烘培檔(.pcache)。
步驟:
A.先在Bake Mode選擇Mesh模式
B.在Mesh Baking中的Mesh參數,選擇加入3D的Mesh的檔案(目前使用.fbx)
C.最後按下Save to pCache file

3.進入VPX編輯器,新增Point Cache Node,在Asset新增剛烘培好的檔案。

4.在Initialize上,加入Set Position from Map的Block,再把Point Cache中的 AttributeMap : position連結Set Position from Map的Attribute Map,目的是為了讓粒子生成的位置可以依照3D檔案的形狀填充。

|小結|
目前可以用3D的模型檔匯入,並以粒子的效果成形,接著會試著了解模型粒子成形的方式,並加入動畫呈現。
pretty handy function! 😉